Citrix PvD (or Personal vDisk) is a great way to allow users to have the freedom of installing their own applications and customizations, while still having the standard vDisk as its base disk. Citrix has made major improvements to this architecture throughout the years. The personal vDisk is a virtual disk that you will actually attach to your virtual machine where the user’s read/writes will go (in order for the changes to persist upon logon/logoff). XenDesktop will magically “merge” the base and PvD in order to reflect version changes, etc.
One of the main problems that users will run into is when they run out of storage of their PvD. This will prevent the user from installing applications, etc., and of course, you, as the Citrix admin, will be responsible for fixing it. This article will be written assuming you are using an ESXi/vSphere environment, but this will pertain to any virtual environment (Hyper-V, XenServer)
There are a couple of basic things you should know about PvD customizations. The settings are contained within HKLM > SOFTWARE > Citrix > personal vDisk > Config. You can change these settings by simply creating a new version on the golden image. The main setting you will want to tweak is “PercentOfPvDForApps.”
For whatever reason, Citrix defaulted this to 50/50. This means that if you provide a user with a 60GB PvD (we’ll use this number for the rest of the article), 30GB will be used for application installs, and 30GB will be used for the user’s profile. This could be overkill for the profile, especially if you are using profile management. So make sure and adjust this setting to best suit your environment.
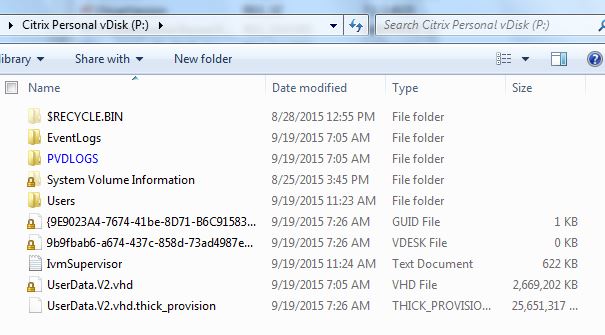
Another thing you should know is that (by default) the user will see 2 drives – the C and P drive. The P drive is actually the whole 60GB VMDK you attached for the PvD. The C drive is a hidden VHD contained within the P drive, which represents the thick provisioned app percentage that you specified in the registry! So C = P * PercentOfPvDForApps(%)

From what I understand – the UserData.v2.vhd.thick_provision is essentially the initial thick reserved app space, while any future expansions go to the UserData.V2.vhd thin provisioned VHD.
So, that’s some basics of personal vDisks in MCS or PVS. I am also going to go ahead and write about a specific scenario I ran into while expanding a user’s vDisk:
As I talked about before, expanding a vDisk is really easy. Simply expand the VMDK in vSphere console, partition it out using disk manager in Windows, shut down the user’s machine, start it up, and Citrix will automagically expand out the C:\ drive based on the PercentOfPvDForApps in the registry.
Well, I ran into a user who had about 11% of his C:\ drive remaining, and it refused to expand, even when I expanded his personal vDisk VMDK. His applications were failing to install because he did not have sufficient disk space. I was baffled!
I happened to stumble across an article that said the user’s C:\ drive portion would not expand unless it had less than 10% remaining (just my luck, the user had around 11%). So I moved an application folder over to his C:\ drive just to eat up space, restarted his VM, and bam! The C:\ drive expanded to the percentage I had expected.
Hopefully this article helped you understand a little bit about how personal vDisks operate, and I hope that the scenario helps someone as unlucky as me out there. Enjoy!!